Tuesday, August 22, 2017

Amost done with 1st floor logs

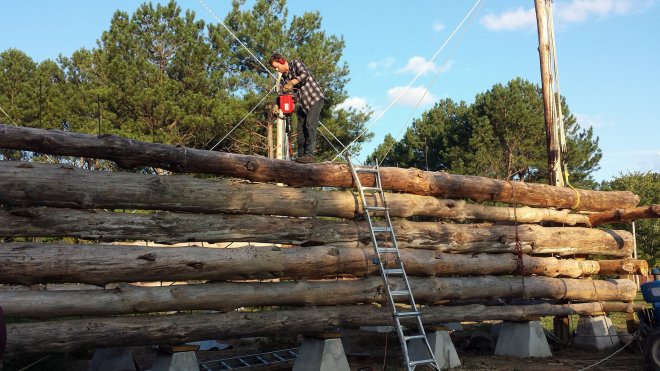
We’re nearing another crossroads- the logs are about 12 feet off the ground, which means they are about 9 feet up from the piers, and about 8 feet up from the finished floor height. All of which means we have to start thinking about the second floor. But first, I’ll summarize what’s happened since my last post.
36680426186_acbd282bde_k

Improving techniques

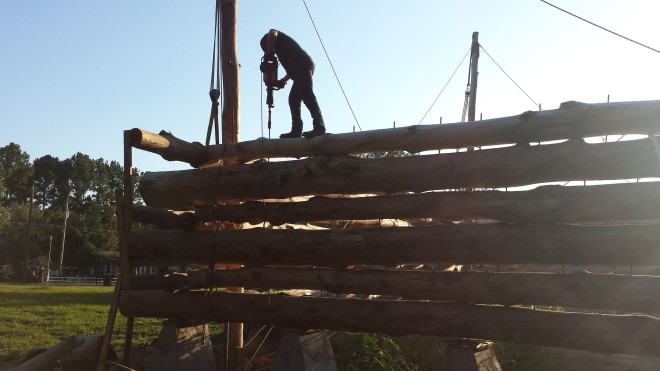
Jack hammer is pretty good

The jack hammer cost me about $130. I don’t know if it’s a monster jack hammer or just a regular one, having never owned a jack hammer before now. But it is definitely heavy- I think it weighs close to 50 pounds. I also ordered a “rod driver bit” to go with it. The rod driver bit is usually for driving electrical grounding rods into the ground. If your home was built in the last 20 years or so, you probably have one of these- it’s to prevent an electrical surge from frying the wiring in your house. The contractor will hammer a 6 foot piece of (usually) copper into the ground, and the easiest way to do it is with a jack hammer.
36173202440_19f0f25657_k
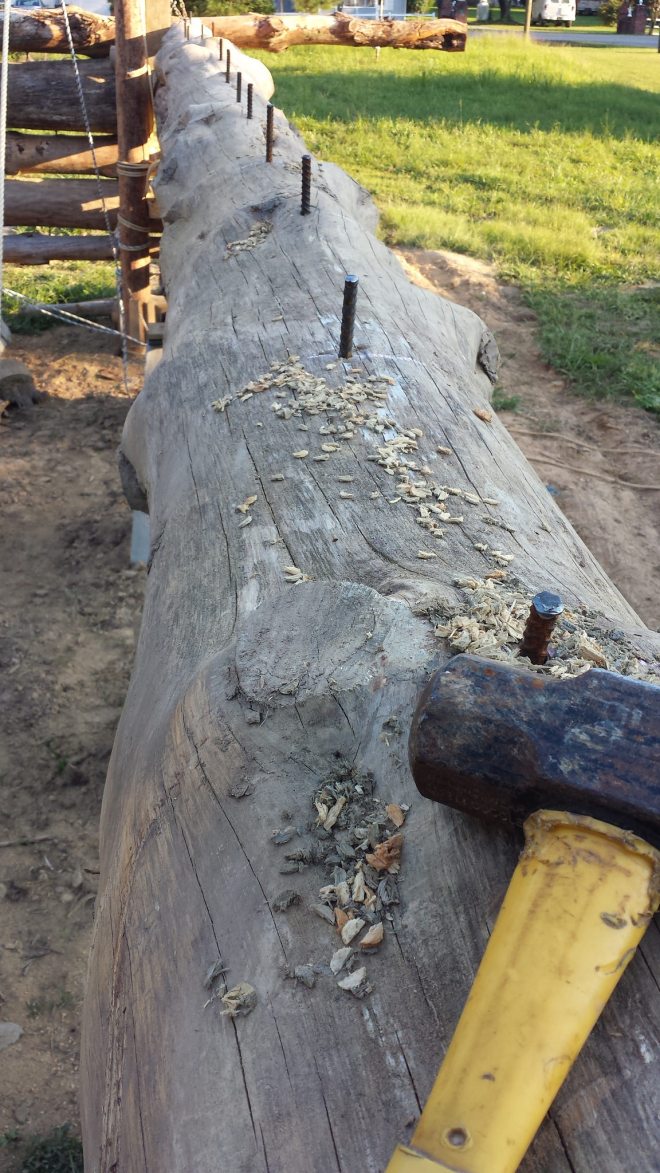
Driving rebar into logs is pretty much the same idea. The bit is just a shaft with a cylindrical hole in the end that fits over the rebar. I drive the rebar as far as I can into the log which leaves about 3 inches for me to finish pounding in by hand, which is very do-able, and it sure beats pounding the whole 20 inch piece of rebar with a sledge hammer. Instead of taking about 8 minutes per rebar, it now takes about 10-20 seconds with the jack hammer, and then about 1 minute with the sledge hammer. So I can finish pinning an entire log in about 30 minutes, instead of about 2 hours. And not as tired, either.
35892204874_f8dcd262d7_k1

Chainsaw needs some adjusting

Last night, my neighbor was asking how it’s going- I told him slow.  When making any straight down cut with my chainsaw lately, the saw wants to veer off towards the left and do this weird curvy cut. The neighbor asked if the blade was straight- yeah, I just bought it about two weeks ago. Then he asked when the last time I sharpened it, was I sitting behind the saw or in front of it? Ummmmm- I was sitting behind it. He said try sharpening it with the blade facing me- sitting behind it makes one set of teeth uneven. Huh. I had no idea, so I tried it on Saturday: I cleaned the whole thing, sharpened it, and went that afternoon to make some cuts- nope. Still curvy. My other saw- the McCollough- gave up the ghost. The repair shop said the piston and rings are no good, and the saw is so old, they don’t make parts for them. I’m going to try another blade and chain on my Husky, since it looks like I’ll be using this saw for quite a while yet.

What are temporary lifting poles?

This is a necessity. What happens is this: all of our logs are crooked, and we are using the crookedest ones first because of all the doors and windows on the first floor- the doors and windows make it easy to cut the crookedest part of the log right at the door or window, and then roll the log this way and that way to make it sit better and get it straightened out for pinning.
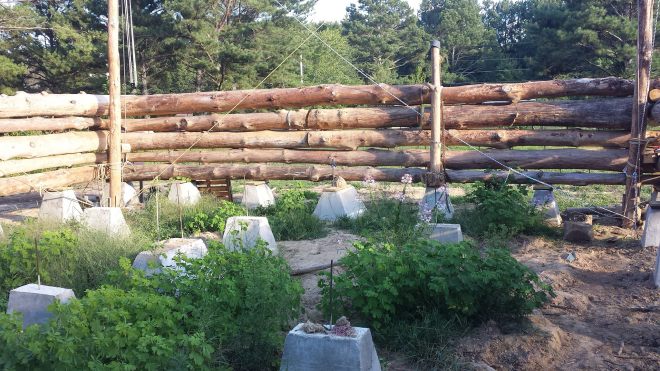
The problem is that when you cut a log in the middle, you have to support it somehow. With the lifting poles in the corner, you need something temporary to hold the log at the cut so it doesn’t roll off the wall. So I use the last 10 – 15 feet of a log as a temporary lifting pole, and stand it up on the pier. I chain-bind it to the existing wall logs, and put a pulley or chain hoist on top and suspend the log I’m about to cut with it. I make the cut, do any adjusting to straighten out the bows or knots, and then pin the log. Then I take down the lifting pole and use it for the next location.
35917504683_eacec3339d_k
see the short temporary lifting pole on that almost center pier?

Plans change…

We wanted a back door, we didn’t want one….Now we want one. While stacking logs, it became apparent that if we added a door on the back of the house, we could use more logs that were crooked. We also redesigned the kitchen- now, instead of separating the laundry room from the kitchen with a wall, we took out the wall between the kitchen and laundry on the plans, and opened up the laundry area and kitchen to each other. Now, when you enter the house from the side-back door, the laundry is on the right, and the kitchen is on the left- opening up a lot more space. I still need to update the CAD drawings, but I’ll get to it eventually. So far, the inspector hasn’t come out and asked to see the plans, and the copy I emailed him- well, he said it was too small to read. If I update them before he asks for them….I guess he’ll never know the difference?

Next item, please

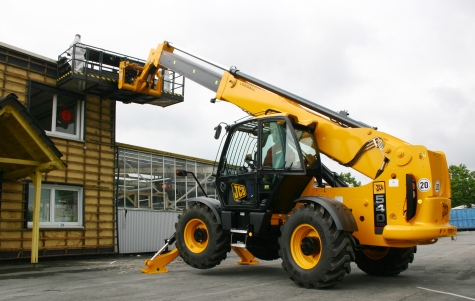
At this point in their builds, many LHBA members begin to put in the RPSL logs that hold up the roof. These logs are bolted to the wall logs at the front and back center of the house, and will be 30 feet tall in our case. The reasoning on why to put them in at this point is that if the walls are higher than the fifth or sixth course, it’s too hard to get them over the wall. In our case, with a pier foundation, we can just slide them under the house, then lift them up on the inside. Our “advantage” is that our house is forty feet long, which makes it easy to work with a thirty foot log inside it. Our other “advantage” is that we are using lifting poles and block and tackle instead of a telehandler.
NC-3187-540-170
I put “advantage” in quotes because most folks using a telehandler would snicker about how these two items- a forty foot home and lifting poles – are an advantage.
But they would probably admit that I’m right in this case. Of course, they would say all the advantages of otherwise having a telehandler outweigh these two drawbacks, whereupon I am reminded that a cheap telehandler is about $8,000 (I’m guessing the one in the photo would be about $70K+), whereas my lifting poles were free, and my lifting equipment was about $400. Sure, they’re slow, but I’ve already had a guy who is using a crane on his build state that I’m stacking faster than he is. Weird.
I guess we’ll wait to do the RPSL’s. The book shows a diagram of how to lift the girder log and RPSL’s and the ridge pole into place using nothing but block and tackle. Sort of a step-by-step. It looks like if we finish the walls first, we can use the walls to attach rigging anywhere we want and get the RPSL’s “just so”. If I try to get them in now, the only thing I have that’s taller that the RPSL’s now is my corner lifting poles, and I don’t want to put that much lateral force on the poles- they could snap off if I lift something very heavy too far away from their centers.

36680425856_13c78431d0_h
While we weren’t watching, she was having fun with the camera…..
That’s where we’re at for now. Feel free to comment below.

Wednesday, July 19, 2017

Up to the 4th course

The method

Each complete layer of logs (made up of all the logs that are on the same level) is called a “course”. The logs are oriented in alternating pin-wheel courses- and by pinwheel, I mean at each corner, one end of each log “passes” a log that is “butted” up against  it. On the next course, you reverse the butts and passes at that same corner, and on and on.
Each log is pinned with rebar to the layer below- every 2 feet. I won’t bore you with too many of the details, but it is a lot of work: for 1/2″ rebar, you drill a 1/2″ hole through the top log. You beat the rebar into the hole, and then halfway through the log beneath it – and you don’t drill into the log beneath for strength purposes. You can do the math- a 40 foot log requires 20 pieces of rebar, so each course requires at least 80 pieces of rebar. I’m on course four, so that’s 320 pieces so far. By hand, with a sledge hammer. I go through at least a gallon of water every evening. The LHBA recommends everyone do the first two courses by hand, and then buy a jack hammer for the courses after that. So, I did my due diligence, and have now graduated:

It’ll be here this week, along with a rod driver bit.
The logs…..are fickle: I made a spreadsheet to catalog the logs by size, length, cut date, peel date, etc, but I haven’t used it yet for stacking logs. My wife has taken over that role, and is doing an awesome job. Usually, our evening goes something like this:
Me: pounding rebar in from last night. Her: wandering around the racks of logs, measuring tape in hand, finding the log that will fit over the top of whatever crooked log we put up the day before. She keeps in mind the height of each course, the type of logs we already have up on whatever course we’re on (monster or regular, knotty or clean, etc.). She’s also looking for which log will match the log next to it- ideally, for each course, you find four logs that have the same bottom and top diameter. She’s also thinking about where the windows are, the stairs, the bathrooms, the doors, the kitchen cabinets, etc., etc., and which log will look best in each location. Each log has it’s own quirks- they bow in different directions, have odd knots, may not match the one below, or may match the one below perfectly. I do a bit of surgery on each log- cutting off a knot here or there to make it fit better with the one below. It is a lot of thinking and measuring.
Capture
When I’m done pinning, I go find the log she marked with an oil pastel (doesn’t wash off as easily as chalk) and drag it over to the house. We proceed to lift the log using the tractor and the block and tackle into position. I like to get it up there, then fine tune it. She likes to make sure it will fit before lifting it. So we argue a little over the method- sometimes she’s right, sometimes I’m right. Eventually the log gets where it’s going. I cut off the obvious knots and lower it down. We end up having to position it with the tractor for the vertical placement, and the car for the horizontal placement.
With these huge twisty monster logs on the lower layers, this process has been taking more than a night, but when it’s exactly right, I place enough rebar in it to hold it until it’s too dark to work, then we go home. Our evenings begin around 4:00 pm, and we usually pack up and go home around 9:00 PM.
I’d like to speed things up, but with the crooked logs we are working with, there is a lot of turning the log this way and that until it fits as well as can be expected. But these are “monster logs” for the lower layers- some are more than six feet around at the base, or 24″+ in diameter. They take quite a bit of effort to place.

Progress is…..as expected

Of course, I always think things are going to go faster than they do. But we really are making good progress, considering the weather for this month. We’ve had so much rain, they declared the drought was over. In fact, there’s been so much rain that trees are falling over around the county.

Rain causes quite a few issues- the tractor gets stuck, the logs are slippery, they get a little heavier when they’re wet, power equipment has to be kept dry, etc, etc. But I did find out something interesting: did you know that there’s no echo when beating rebar into a log during a downpour? My theory is that the raindrops absorb the sound. Go ahead- ask me how I know that…..

….And then there’s the heat

Yeah- when it’s not raining, the humidity started climbing along with the temperature. The last three days of last week, the heat index was 105. We delayed working on the cabin until early evening on those days. I usually end up soaked from sweat from head to toe. I bring a change of clothes for the drive home, and I go through about a gallon of water every evening. I shouldn’t work in the heat, but we want this so bad that I just push through it all. My amazing wife does laundry for me and repairs my jeans (I now own one pair without any repairs- she’s not happy about that, and banned me from wearing that one pair to the property).

Lessons learned

One thing we’ve learned is how much you can use the crookedest logs- if you know where your doors and windows are going to be. We’ve placed the orneriest logs- logs that curved in all different directions- and they look really good. Had to place temporary lifting poles in the middle to hold them while I cut out the crooks, but when it’s all done, they really look good.
Yes, you can remove a log after placing it. It’s not easy, but after pinning it once, then not liking it, I bought a sawzall from Harbor Freight, and cut all the rebar out of it while suspending it with the pulleys. I turned it and pinned it again, but ended up not liking that position either. So I cut it again, then carefully pulled it out. It just wasn’t working. I don’t recommend it- we lost a day’s worth of progress, but, in the words of my late friend Ken Hieronymi, “I guess I’ll just eventually go crazy from every time I come out here and see that [log] hanging there all cock-eyed.” Didn’t want that to happen, so I pulled the beast out of there.
The neat thing is, the logs look better up than they do down. Seems obvious, but until they are stacked, you can’t get an idea of how the whole thing is going to look. One thing we’re both really happy with is that we made the butts of the logs face the front and back of the house. That’s how I wanted it, but my wife thought it might look better with the tips of the logs facing the front- so that the huge logs wouldn’t distract from the look of the place. We put the discussion on the LHBA forum- and a lot of people said they wished they had gone with my idea. Then one guy said to think about how the roof overhang is going to be supported- with the tips of the logs or the butts? So, for strength, we went with the butts facing the front and back- and it looks so good! Because it’s a 40×40, we needed to offset the mass of the house with some massive looking logs- and boy do those butts look good! I just realized this is starting to sound like some other kind of discussion, but I assure you, I’m not going there!
See:

You made it this far? Here’s a treat:

This is a video of us lifting log #16 into place: Lifting Log #16 into place.

Thursday, July 6, 2017

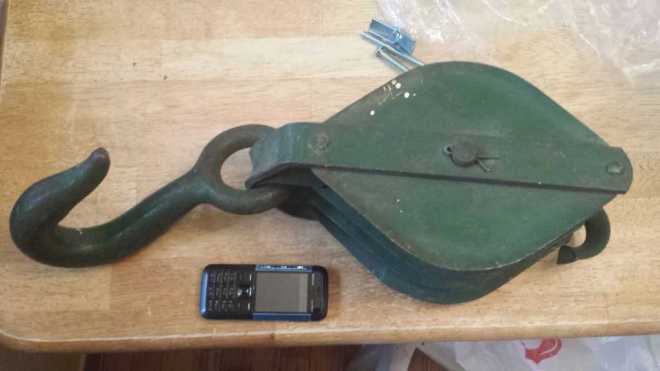
How to make your own triple blocks for less than $45

Why a triple block? Why not a double? or a single?

Because two triple blocks working together gives you a 7:1 mechanical advantage- 5,000 lb log requires only ~720 lbs of force to lift. And you can use just 5/8″ thick rope to lift 720 lbs. A double block would only reduce the force down to 1,250 lb. But you have to double that- for each end of the log. And a single……ummmmm…..there’s no mechanical advantage to a single. Stop talking about single pulleys. On the other end, a “quadruple” block doesn’t really exist beyond huge construction cranes with wire rope- from what I’ve seen and read, anything more than three pulleys and the friction increases beyond the efficiency gained. So, a triple block it is.
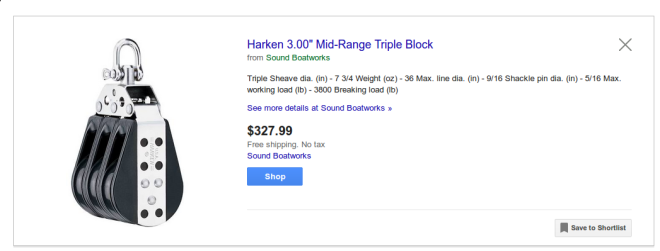
First, I looked online. And found…..not quite nothing, but almost. It’s unbelievable in this age of Amazon and Ebay that you can’t find a triple block with more than 3,000 pound capacity. I suppose not many people are lifting heavy objects by hand. Ok, you can find them, but they are insanely expensive, and you need two to make a set. Not to mention you need four sets to work efficiently. Look at that price:2017-07-03-22-48-53_scrot
I mean, I guess you could climb a 30-foot lifting pole and change the block and tackle out every time you want to lift a log, but you would still need four pulleys- two on each pole- to lift each log. So, it would cost you $1,300, plus rope (about $300).
This calls for a cheaper solution:

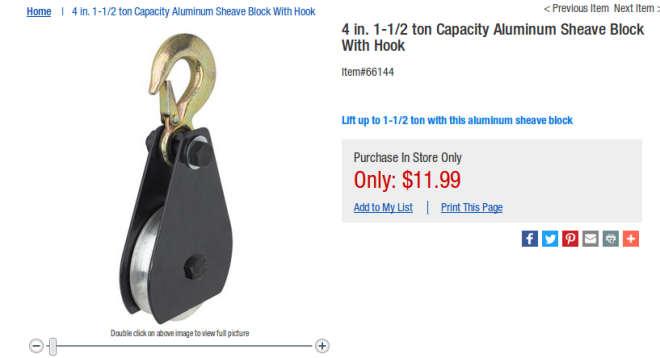
Enter Harbor Freight:

2017-07-03-23-07-00_scrot
Of course, I’d need six of them to make a set, but that’s only $72, not $327. And some grade 8 bolts, which are easy to obtain from Fastenall.
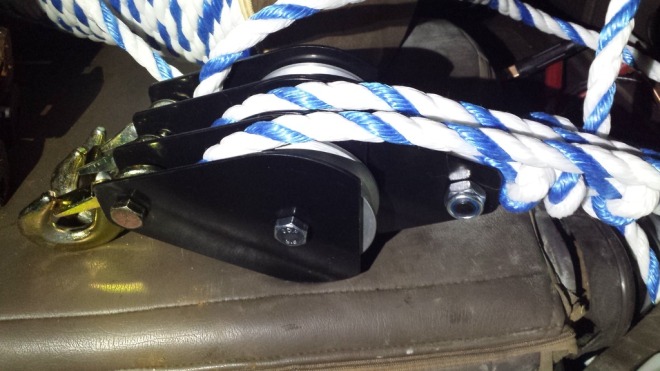
Here’s what I came up with:20170705_204824_zpsm7auqpcv


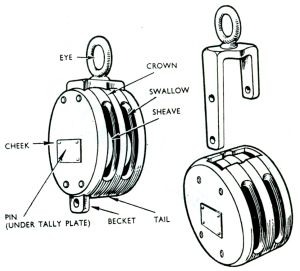
Some more notes: I needed somewhere to tie the end of the rope- on the antique pulleys, there’s a place called a becket 70d1a3c340f41214567fd48f2725ccd9--block-and-tackle-pulley-light. I didn’t have one, so I took two extra plates from a single pulley, and put a bolt through them.
The results

I just finished lifting the biggest log yet- over 6 feet around at the base, and 50+ feet long- I figure it weighs around 6,000 lbs. The pulley held just fine- in fact, it held better than the #6 triples that I had on the opposite end. The singles (on the box) were originally rated for 3,000 lbs, so I figure the modified triple is worth at least that much, but with that huge log, probably more like 4,000 lbs.
I spent $12 per pulley x 3 pulleys = $36. The two grade 8 bolts were about $4 each. So for ~$45, I got what normally costs over $300.

Thursday, June 22, 2017

First Layer Done


20170621_191651_zps7mylvvyk

This is a great feeling- The lifting poles worked, the pulleys and chain hoists worked, we figured out the kinks and got all four logs on the piers. It looks less like a grave yard with tombstones sticking up, and more like a….well, at least a perimeter with big posts sticking out of it: There was a little preparation required before setting the logs down on the piers:

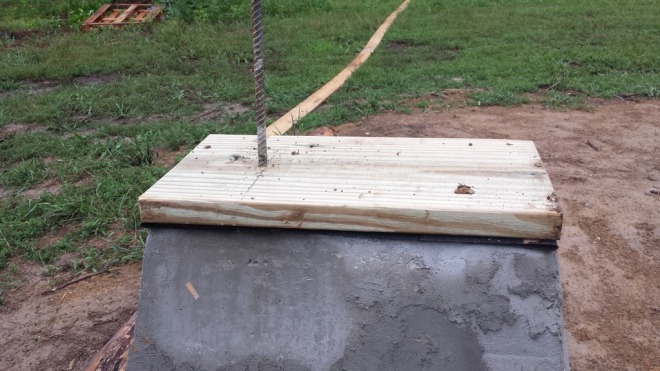
20170615_183820_zpsgquk3nsvThat’s pressure treated #2 pine – 2×12 from the local hardware store, laying on top of a shingle (90lb builder’s felt) that I sourced from the county dump (they were new in the plastic, so I scooped up a bunch).
We set the first log, then I had this nagging feeling that I was supposed to call the inspector before stacking logs. I was pretty sure he would find something wrong with the concrete. I checked the inspection schedule and it said a post-pour inspection was due, so I worked up the motivation and finally called him. He said- “No, go ahead and keep doing what you’re doing- call me when you get to the rough in.” Ok! We’re on a roll now. The rough in is when you have your electrical outlets and wires run, along with the plumbing, but you haven’t put any drywall in (yes, we will have framed walls inside the cabin, just like a normal home).

Piqued their interest


With four 30-foot lifting poles sticking up in the air, our property has become something of an attraction. Everyone from the water utility guys, to the motorcycle guy down the road slows down and takes a gander every time they drive by. The utility guys actually drove onto the property and looked over the mechanics of everything- according to one neighbor they were there for over an hour checking out the ropes, pulleys, rebar, and logs. The neighbors say this build is the “talk of the town”. Everyone is so nice and excited. Now when I’m out there working, I’ve seen several cars every day slow down to look. I’ve seen some stop, then back up, stare, then wave, and drive on slowly. A few have even pulled up, just to say hi (and get a closer look). The older guys who stop by tell me if they were 10-20 years younger, they’d be doing this too. It’s nice- the positive support is great motivation.  I usually wave and continue on with my business. The permit office lady saw me at the store last night. She said the utility guys had their doubts, but she set them straight- “Don’t worry- he’s an engineer- he’s got it all figured out.” Wellllllllllll……yeah. I’d like to think I’m more of a mathematician, you know, because that’s what my degree is in, but ok…….


A few notes about the method


If we were laying 2×4’s, it would be pretty easy- draw a center line on the 2×4, measure the distance between each piece of rebar, drill holes, place 2×4 on the pier, done. Logs are a little more hairy….
  • Curvy logs

They are not straight- and they may curve in more than one direction. Also there are a lot of knots on this wood. Finally, the logs have a lot of taper, which is a comparison of bottom diameter to the top diameter. The taper is a measure how much the diameter decreases from the bottom to the top.  LHBA recommends logs have a taper of less than 1 inch for every 10 feet. Our logs are about 20″ on the bottom, and 12″ at the top, and 40+ feet long. Our taper works out to be 20-12 = 8″ over 40 feet, or 2″ every 10′- double what LHBA recommends. But LHBA also recommends building with what you have. It can be done, but adds a level of complication when you try to level the structure. Probably more on that will come as we stack logs- each layer, you alternate butts and tops: where the butts are on one layer, is where the tops will be on next layer. If you “mind your levels”, i.e., measure the height at each corner as you stack, you can pick logs that match each other. The goal is less than 1/2″ height difference between all corners at the top of the walls.
  • Block and tackle

1489785074404_zpsq4tepvus
I’m using antique triple blocks that weigh about 20 lbs each. I need two for each pole- one on top and one on the bottom. They are rated at I-don’t-know-but-I’m-sure-it’s-a-lot pounds. They are not made anymore because no one does it like this. The physics behind them is pretty cool. My rope is rated at about 800 lbs, but the logs weigh between 3,000 – 6,000 lbs. Using the triple blocks, I’m gaining a 7:1 advantage- 850 lbs per log, but since I’m using 2 sets of blocks- one on each pole, it’s really 850/2 = 425 lbs per log…..Well, I thought it was cool.
  • Other equipment

I’m also using 6,400 lb straps from Harbor Freight, a Cant Hook (or “can” hook ), my wife’s Landcruiser (helps center the logs over the rebar), a chain saw, sledge hammer, some trucker chains (5,400 lb) and my trusty tractor.
  • The process for the first course

The first course is different from all the other layers- you are putting the log down on the rebar (cemented into the piers), instead of pounding the rebar into the log (like on the rest of the courses).

I stair-stepped the rebar before putting the logs on: I cut the longest rebar to 30″, then made the one next to it 28″, then 26″, etc. This helps when lowering the log so you only have to mind getting one piece of rebar in the log at at time.
I also tried the recommended template approach- lay a strip of 1×4 on the piers and mark where the rebar is, turn the log upside down and mark the holes on the log- but they were so bumpy and long that it didn’t work. I asked around- and found a method using string- attach a string to the piers, and measure the offset of the rebar from the string, (remembering that if the rebar is 1″ to the right of the string, the hole will be drilled 1″ to the left of the center mark on the log (because the log is upside down)).  Transfer this info to the log, then drill straight down. Flip the log over (flip is a generous word), then attach to lifting straps, pull until it’s over the rebar. Then slowly lower the log until the rebar can be fed into the hole in the log (done by my wife).

Summary

This is very exciting. All the work for the past year+ designing our plans, getting utilities installed, cutting down trees, borating them, removing branches, burning brush piles, digging holes, building forms, fixing the tractor, and on and on- got us to this point. I guess you could say we are done with phase I. Phase II will be getting the rough in complete- the goal is to get the roof on this year (by New Years Eve). Phase III will be finishing the inside. So I’ll just say thanks for coming on this journey with us. Feel free to leave comments.

Next up is the rest of the courses- these are placed on top of the log below, pilot holes drilled, then rebar is pounded through log and halfway into the log below- every two feet, and offset by one foot on alternating rows.

Thursday, January 23, 2014

Finished my sweater

I just finished my first full-size men's sweater. I've been working on this sweater since April 2013. I looked and looked for a pattern, and couldn't find one I liked, so I finally invented my own pattern. I knitted it while waiting in line at school to pick up the kids, the doctor's office, the thrift store while my wife shops, as a relaxant just before bed, when I was put on hold, and any other time I thought I could get away with it. But not church: my wife said that it would be too distracting, and also, it looks like I'm not paying attention. It's completely seamless, knitted completely in the round, and
from dark brown fisherman's wool on size 6 needles. I found out that I knit continental style (yarn in left hand). I find it to be a lot faster, and with less carpal tunnel issues. Yesterday, I found a new style called peruvian style- someone claims it is faster than continental. Hmmm. It looks weird to me, and too many moving parts.

Design: I wanted a design that would go with almost anything- jeans, slacks, night out, whatever- I'm a little disappointed that a simple sweater for a man without any girly-cables or flashy 1980's style colors isn't the first thing you find when you search. I guess there's no market for normal anymore.

 Construction: I wanted a sweater that's easy to make, and one that fits without being baggy in odd places. I opted for raglan style sleeves because with knitting in the round, it's easy to add stitches up to the point where the sleeves separate from the body of the sweater. This is a top-down in the round sweater, so I placed markers on the needles after finishing the neck to help define the sleeves. Top-down construction is a easier to fit as well while you're making it: you can try it on as you go to ensure a perfect fit. The neck, sleeves and waistband have to have the right proportions (thanks to my wife for eyeballing it for me).

So, because I went so slow, everything was perfect from beginning to end... Or not.

Problems: 1. The sleeves kept getting too skinny too fast- at one point, they were squeezing my forearms, at another they were too baggy. The trick is to decrease raglan sleeves quickly near the armpit, then don't decrease hardly at all until halfway down the forearm, then again at the wrist (slightly- I was surprised that from the forearm to the wrist was almost the same circumference). I think I pulled the sleeves out about 5 times before I finally got it right. I could have made 2 more sweaters. Oh well, lessons learned.

2. How do you finish sleeves and waistbands? I decided to knit the ribbing twice as long as I wanted, then fold it back on itself (towards the inside), and bind off using a 3-needle bind-off. This solves a few problems- stretched out sleeves won't ever happen, and the sweater becomes warmer because the ends are sealed off. I'm still working out what the final pattern was, and I'll post that soon.

Wednesday, March 14, 2012

Who is the best candidate for President of the U.S.?

I've been watching the back and forth about the direction of our country for some time now.  I think it's time to post my thoughts.

On the state of the Country:


Please thoughtfully read this.  It was written about a tyrant who lived 236 years ago.  I think we are headed in this direction.  My opinions on our current problems are in "[]". At the end of this, I give the my source:

He has refused [to uphold laws such as the Defense of Marriage and others that are]... the most wholesome and necessary for the public good.
He has [tried to work around the] Representative Houses repeatedly, for opposing with manly firmness his invasions on the rights of the people.
He has endeavoured to [obstruct]... the Laws for Naturalization of Foreigners; refusing to pass others to encourage their migrations hither...
He has obstructed the Administration of Justice, by refusing his Assent to Laws for establishing Judiciary powers.
He has made Judges dependent on his Will alone [or appointed judges that will do his will]...
He has erected a multitude of New Offices, and sent hither swarms of Officers to harrass our people, and eat out their substance.
He has affected to render [a military such as the TSA, which is]... independent of and superior to the Civil power.
He has combined with others [such as appointing many Czars, and unconstitutional organizations such as the FDA, BLM, and EPA] to subject us to a jurisdiction foreign to our constitution, and unacknowledged by our laws; giving his Assent to their Acts of pretended Legislation:
For Quartering large bodies of armed troops among us [known as the TSA]:
For cutting off our Trade with all parts of the world [through regulations on our oil companies and taxes on our corporations]:
For imposing Taxes on us without our Consent [through unlawful acts such as the Healthcare act]:
For...abolishing our most valuable Laws, and altering fundamentally the Forms of our Governments......
He has excited domestic insurrections amongst us [such as the Occupy Wall Street movement], and has endeavoured to bring on the inhabitants of our frontiers, the [Occupy wall street mobs]..., whose known rule of warfare, is an undistinguished destruction of all ages, sexes and conditions.
*****
You may read the original document here.


2. The current republican candidates respond to a messy house....
Your house is a disaster.  Your closets are full, your cupboards are full.  In fact, if there's a flat spot in your house, it has stacks of stuff on it that you've been meaning to get to for years.  Finally, you've had enough.  You call three cleaning companies to get a quote on cleaning up the mess for you.  Here's how they respond:

Santorum cleaners: 
"Well, Ma'am, I think I can fix the whole thing for you, but this medicine closet looks pretty bad.  I don't know- you think I should focus on this medicine closet? You've got a pretty messy house, but this medicine closet really needs some focus.  What's that? Your office?  Oh, yeah, all the bills piling up. Sure. I can look at that.  Let me get this medicine closet fixed first, ok?"

Gingrish cleaners:
"First thing we need to do here is put an addition on the back that is already clean.  We'll call it the base.  What? how are you going to pay for that?  Oh, I'll get a bunch of your neighbors to help out.  They will want to help because they want you to have a clean house.  Yeah, I'll create a partnership, and they'll join it.  Hmmm? What if they argue? Oh, I'm a great debater.  Say, this house reminds me of a house I used to live in..."

Romney cleaners:
"Sorry, Ma'am- I'm not very good at being warm and friendly.  What's that? Oh, yes, I can clean this house. What we need to do is sit down and get a plan together- we'll figure out what you need, and what you don't.  We'll organize it by room.  I'll get the best people in here- they're all experts. Oh, don't worry about the cost- I've done jobs in the past for $2.  Yes, Ma'am.  $2. For the whole job.  What's that? Oh.  Sure- I can't start right now."

A house on fire, a.k.a.: Romney's not conservative enough.
Ok, so Romney's not conservative enough for you.  Fine.  Here's how I see it.  Say there's a building on fire.  Romney, the firefighter goes in and saves 25 people from the flames.  Sadley, 3 people are not saved and die in the fire.  It's really sad that those 3 people died.  The conservative media- Rush, Mark Levin, etc, are really upset about those 3 people.  Isn't this odd?  I mean, Mitt goes in, buys companies during his days at Bain Capital.  He cleans out the dead wood.  He fires people, closes stores- it's really painful.  Then the company starts making a profit.  They hire people, open tons of stores, sell a lot of products.  They get rich.  So does Romney.  The proportion of people he saved is like the story of him saving the 25 people.  Sure 3 people died.  But 25 people were saved.  How do you report this story?  "Oh, he's an evil vulture capitalist!"
puh-leez!

Don't try to debate me on the issues I don't know enough about:
Here's what I do know:
During the 2002 Olympics, Mitt worked for $1.00 per year as the president of the organization.  He turned down a salary of $825,000.00.  The Olympics, for the first time in a long, long time actually made a profit under his watch.  Has the government ever made a profit?  I can't remember.  The cost of the Japan games of a few years before that? $4 billion.  The original budget of the Utah Games? around $135 million.  Did Mitt Romney profit from the Utah Games? I think so- after he took a HUGE risk.  None of you would take that kind of risk.  He wrote a book about it.  You should read it. 

I was there during the Olympics.  I worked downtown.  I had to ride my bike just to get around because of the security after 9/11.  Some people complained about the lack of parking downtown for some of the events.  Mitt got wind of it, and bought a piece of property, brought in some dump trucks full of gravel, smoothed it out, changed some bus routes to pick people up at the new "park and ride" and boom! problem fixed. It took just a week.  He got in touch with decision makers- mayors, city councils, the transit authority, the property owner, the police- even the FBI.  He made his case, and they all agreed, and it got done!  It was amazing- the amount of talent the guy had for creating incentives and markets- I got lucky enough to get a "green jello Olympic pin WITH carrots" at work.  That thing was worth $100 by the time the Olympics ended.  He created an entire economy just for the olympics.   I wonder what he could do for our country?

It gets better: Mitt Romney donated his entire salary during his term as Governor of Mass.  Why? He said it didn't feel right to take a salary while other people were sacrificing during that hard time in that state.  That makes him a cold, heartless hairdo, doesn't it?  Why doesn't he CROW about this? Simple answer: he hasn't spent 20 years in Washington.  He doesn't care to tell you.  Research it.  My question is this: Hey- Newt, Rick, Obama- did any of you donate your entire salary while you were in public office?

I want freedom- freedom to fail, to succeed- whatever.  Taxes and regulations suck away that freedom.  Go Mitt!

Sunday, June 5, 2011

What I learned from the tornadoes in Alabama

I fancy myself as a kind of a survivalist. But the tornadoes caught me by surprise. I told myself I would get gas on Thursday, after the storm was over. But on Thursday, I found out I didn't even have enough gas to drive 40 miles to get more. There is no gas without electricity. It took three days to get generators into Huntsville gas stations. So, I think there's some lessons here that I would like to share.

Food
1. Coolers: Doctors' offices usually get vaccines in super thick (1 - 2" walls, and triple lined lids) Styrofoam containers. I picked up three of them a year ago. They are not the cheap ones you get at the store, and are way better than the plastic-lined ones you get at camping stores.

2. Water: There are a lot of creeks and rivers in Huntsville, Alabama. The water towers and purification plants are run by electricity. I have two 55-gallon water barrels in my backyard, but did not need to use them. Purification tablets or bleach is useful, too.
3. Food: We had lots of cereal, but keeping the milk cold was a problem. Kroger wouldn't sell milk because it had lost refrigeration overnight. We bought some that afternoon at a pharmacy. It too, had not been refrigerated, and was room temperature. We put it on ice, and hoped for the best. The thing with milk, as long as it has not expired, you can save it in this situation if you act quickly. We used it for three days after that, and it was fine.

3. Dutch oven: I used a small wire screen in the bottom of a dutch oven to keep pizza off the bottom and was able to cook pizza in the oven. We also had souper chicken: 1 package of chicken tenders, 2 cans cream of mushroom soup, 1 can milk and 20 minutes with about 8 charcoal briquettes under the oven and 8 on top. During the last 5 minutes, boil water on top of the oven - just set a pan on top of the coals on top - for instant rice. I also appreciated having a two burner Coleman campstove: These are neat. I think you can even use gasoline for fuel, but don't quote me on that. Make sure you have enough fuel.

Clothing
I washed clothes by hand in a tub outside, then hung them on the fence to dry. It was nice to still have hot water because of our gas water heater.

Shelter
Keep the windows open during the cool part of the day, shut them when it gets hot.

Transportation
1. A good bicycle with a rack on the back is what was really helpful those first days when I had no gas. Even after I had gas, it was nice to conserve it by riding a bike. A great little item that is not expensive is a power inverter. I was able to keep batteries charged, and my wife's phone charged. She doesn't have a car charger. Harbor freight sells a solar charger for $12.00- that would have been nice.

2. Getting gas: Consistently: the lines were always longer in the morning. I found if you waited until 3 pm, the lines shortened up nicely. The guy on the radio said: figure 5 minutes for a fill up. That means every 12 cars is an hour wait. 75 cars were waiting at one station I went to.


Thoughts on gas generators:
Nice. But they take gas. And a lot of people said they hadn't used it in ten years. I helped a guy clean up his yard who had one. He said it used about 5 gallons per day (24 hours). They are easy to hook up:
1. turn off your main breaker
2. find the breaker for your dryer or some other big appliance (not your fridge- you want to use your fridge, right?)
3. disconnect those wires from the breaker.
4. Plug a 12 gauge extension cord into your generator (your generator is off, right?)
5. Cut off the other end of your extension cord. The white wire goes to your bus, and the black one goes to your breaker. Ground the other wire.
6. Choose the appliances you want to use and turn on only the breakers for those appliances.
7. Get an amp meter to measure your output, or just don't use many appliances.


If you had to go buy gas for it (40 miles one way) that's a 2 hour trip. That's if you can get gas. We did ok without power. If you want to get one, now is the time to buy. Now that the storm is over and the power is back on, I've found 5 on Craigslist already.

I'm looking into solar panels and an extra line just for the fridge. I'm found a kit online for about $300. Then I'll need batteries- the whole thing will probably cost $600.00. I know it sounds like a gas generator would be more convenient, but I'm figuring that the solar will pay off daily- even when there is no power outage, it will save on the electric bill. I figured it will pay for itself (at most) in two years. 6.5 amps at 110 volts means you need about 80 watts of solar (this figures in the cycling of the fridge, of course- i.e.: your fridge doesn't need to run constantly!).

Light:
Don't use those dinky little tea candles, if you can help it. I got some big 55-hour emergency candles, and they are nicer and brighter.

Neighbors:
Check on your neighbors. Every one I checked on and tried to help actually had info or equipment or transportation that ended up helping me, too. We looked out for each other. Until you've experienced it, it gets very dark without street lights and a moon. The curfew (dusk to dawn) only works for law-abiding citizens. Criminals don't pay attention to laws, and I'm glad our dog is a ferocious looking thing that     b a r k s    h i s     h e a d      o f f !      You need one with plenty of teeth on the business end of him, or a gun. I'm sorry, that's just how it is.

Friday, April 8, 2011

what's new in 2011

striped toe-up custom socks made from super wash wool
The year is already slipping away, and it's only April.  Knitting has had to take a backseat to Abstract Algebra, which is currently kicking my butt.  But I have managed to turn out a pair of socks with help from my Christmas present- a book called "Socks a la carte 2: toes up".  Julie is still not impressed because there is still evidence of a seam in the toes, even though I used "Judy's magic cast on" which  eliminates a seam in the toe.  Oh well. I will keep trying.  The garden is in place. mostly.  I think squirrels are getting the leaves of the tomatoes.  Taxes are done, dog is fat.  I'm going back to my abstract algebra...

Sunday, January 30, 2011

Turtles

Sooner or later, I knew this was coming.  But I'll start at the beginning. Julie and I bought our house in 2008.  One day, Julie laid a rope out in the back yard in the shape of a pond, and started digging.  Of course I felt sorry for her, and started to help.  Ok I took over.  Using only a pick and a shovel.  The month after I started, she bought turtles from a source in Florida.  They ship the turtles overnight.  I built a temporary enclosure for them and continued to dig.  Three months later, we put in a liner and a pump. It ended up being 22 feet long, 8 feet wide, and 4 feet deep at the deepest point.  I think it's about 2000 gallons. In went the turtles. The first year, we put in a waterfall.  The next year, grass.  Last year, bushes and a garden.  And Julie thought the pond was too deep, so I filled it in a little.  It's a work in progress.  As in the grass keeps dying.  We're working on it.

The first turtles were a pond turtle (Moss), two western painted turtles (Dribble and Nick), and a musk turtle (Yoda).  We added a few box turtles that we rescued, but ended up taking them back to the forest when one of them drowned (I was able to resuscitate it by pushing it's legs into it's shell several times.  kinda weird, but it lived).  We rescued a wild cumberland slider with a huge bite out of it's shell, and also missing a tail.  We named him Sonny.

We had two surprises last year- two of our turtles had babies- the slider, Moss, and the musk turtle Yoda. On a side note, Bradley is upset that Yoda was a girl turtle  He tried to deny it for a while, and begged us not to let anyone know.  We have 16 new sliders inside out house now.

The turtles are pretty cool.  Mostly, they just like to sun themselves on the log.  They actually need sunlight to help them digest their food.  Other facts about turtles:
-Musk turtles get their name from the musk they emit when frightened.
-The largest freshwater turtle in the world is the Alligator Snapper.  They can weigh up to 200 lbs, and can be found in southern Alabama. And they do snap.
-Box turtles can pull their entire body inside their shell and can seal themselves in so tight they are nearly impossible to get out.
-pond turtles "hibernate" in the winter.  Their blood become a sort of "antifreeze" and they hardly move for 3 or 4 months of the year.  They burrow into the mud, and can absorb oxygen through their skin.
-a female slider turtle can hold 16 eggs inside her body for 2 years before laying them.
-the southeastern U.S. has more varieties of turtles than any other part of the world.
baby softshell turtle- very, very rare find!

baby snapping turtle- not an alligator snapper.  Notice the dinosaur-like plates on arm!

box turtle

female box turtle

Moss and a western painted turtle

baby map turtle.  Very hard to find at this age.

bottom of map turtle

a box turtle we named Spot.

Sunday, December 26, 2010

photos

Here are some photos:


William S. Berry


I got into family history a few months ago. My great ++++ grandfather was killed as a missionary for the Church of Jesus Christ of Latter-Day Saints back in 1888 in the Tennessee Massacre. I found out I now live about 2 hours from the site. So I made the trip to see it. I took some photos.

Ironically, William Berry was born and died in Tennessee, but not before he moved to Nauvoo Illinois a few months after the prophet Joseph Smith was killed, and headed west with the pioneers and Brigham Young. After reaching the Salt Lake Valley, the Berrys were asked to settle in the St. George area. Finding their ambition was bigger than the area afforded, they moved just outside of town, and called their new home 'Berryville'. In those days, the town would give acreage to anyone willing to work on the canal that would provide Hurricane, Utah, with water.  I think William got about 10 acres out of the deal. He planted pecan trees on his land, and there are still pecan trees on the Berry side of town to this day.  After getting comfortable, William Berry was called on a mission to the Southern states by Brigham Young. He served in several areas in Tennessee before ending up in Hohenwald, TN.

Instead of retelling the rest of the story, here is a link to Bruce Crow's blog.

to knit


So, I learned how to knit. I know- not too manly. But only in America. Most other European countries, men are knitters, too. Granted, just try and find a magazine dedicated to men who knit (crickets chirp in the background). Well, for me, it started when Julie's mom had a kidney transplant in 2009, and Julie was so bored while at the hospital with her mom, so she asked if I had any ideas for what to do.

I said, "Ask her how to knit."

A few days later, Julie came home and showed me the 'knit stitch.' A week later, she showed me the 'purl stitch.' I was 'hooked.' I read all about it online- found the world's fastest knitter video, how to cast on, bind off, knit in the round, and with dpn's. I joined ravelry, and lion brand, and downloaded some patterns. I have knitted half a dozen hats, 2 pairs of socks, 3 scarfs, a pair of gloves (hobo gloves- the fingers are open at the end), a hoodie for Diesel, and I'm in the middle of a hoodie for Levi.

But it really started in New Zealand. All those people knit- men and women. I have some beautiful sweaters, (and some ugly ones, says Julie!), and a lady there tried to teach me to knit. I never had time to knit, I thought, and that was that.

Now I knit in my car while waiting in line at the bank, the doctor's office, the school, late at night. On a side note, it is really cold in my shed right now, and so woodworking has taken the season off.

October 2010