
This is a great feeling- The lifting poles worked, the pulleys and chain hoists worked, we figured out the kinks and got all four logs on the piers. It looks less like a grave yard with tombstones sticking up, and more like a….well, at least a perimeter with big posts sticking out of it: There was a little preparation required before setting the logs down on the piers:
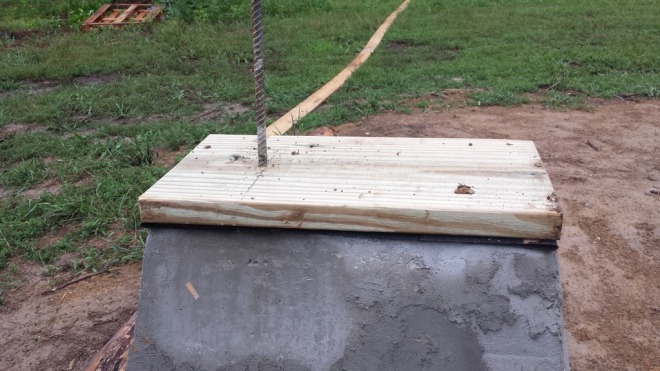 That’s pressure treated #2 pine – 2×12 from the local hardware store,
laying on top of a shingle (90lb builder’s felt) that I sourced from
the county dump (they were new in the plastic, so I scooped up a bunch).
That’s pressure treated #2 pine – 2×12 from the local hardware store,
laying on top of a shingle (90lb builder’s felt) that I sourced from
the county dump (they were new in the plastic, so I scooped up a bunch).We set the first log, then I had this nagging feeling that I was supposed to call the inspector before stacking logs. I was pretty sure he would find something wrong with the concrete. I checked the inspection schedule and it said a post-pour inspection was due, so I worked up the motivation and finally called him. He said- “No, go ahead and keep doing what you’re doing- call me when you get to the rough in.” Ok! We’re on a roll now. The rough in is when you have your electrical outlets and wires run, along with the plumbing, but you haven’t put any drywall in (yes, we will have framed walls inside the cabin, just like a normal home).
Piqued their interest
 With four 30-foot lifting poles sticking up in the air, our property
has become something of an attraction. Everyone from the water utility
guys, to the motorcycle guy down the road slows down and takes a gander
every time they drive by. The utility guys actually drove onto the
property and looked over the mechanics of everything- according to one
neighbor they were there for over an hour checking out the ropes,
pulleys, rebar, and logs. The neighbors say this build is the “talk of
the town”. Everyone is so nice and excited. Now when I’m out there
working, I’ve seen several cars every day slow down to look. I’ve seen
some stop, then back up, stare, then wave, and drive on slowly. A few
have even pulled up, just to say hi (and get a closer look). The older
guys who stop by tell me if they were 10-20 years younger, they’d be
doing this too. It’s nice- the positive support is great motivation. I
usually wave and continue on with my business. The permit office lady
saw me at the store last night. She said the utility guys had their
doubts, but she set them straight- “Don’t worry- he’s an engineer- he’s
got it all figured out.” Wellllllllllll……yeah. I’d like to think I’m
more of a mathematician, you know, because that’s what my degree is in,
but ok…….
With four 30-foot lifting poles sticking up in the air, our property
has become something of an attraction. Everyone from the water utility
guys, to the motorcycle guy down the road slows down and takes a gander
every time they drive by. The utility guys actually drove onto the
property and looked over the mechanics of everything- according to one
neighbor they were there for over an hour checking out the ropes,
pulleys, rebar, and logs. The neighbors say this build is the “talk of
the town”. Everyone is so nice and excited. Now when I’m out there
working, I’ve seen several cars every day slow down to look. I’ve seen
some stop, then back up, stare, then wave, and drive on slowly. A few
have even pulled up, just to say hi (and get a closer look). The older
guys who stop by tell me if they were 10-20 years younger, they’d be
doing this too. It’s nice- the positive support is great motivation. I
usually wave and continue on with my business. The permit office lady
saw me at the store last night. She said the utility guys had their
doubts, but she set them straight- “Don’t worry- he’s an engineer- he’s
got it all figured out.” Wellllllllllll……yeah. I’d like to think I’m
more of a mathematician, you know, because that’s what my degree is in,
but ok…….A few notes about the method
If we were laying 2×4’s, it would be pretty easy- draw a center line on the 2×4, measure the distance between each piece of rebar, drill holes, place 2×4 on the pier, done. Logs are a little more hairy….
Curvy logs
Block and tackle
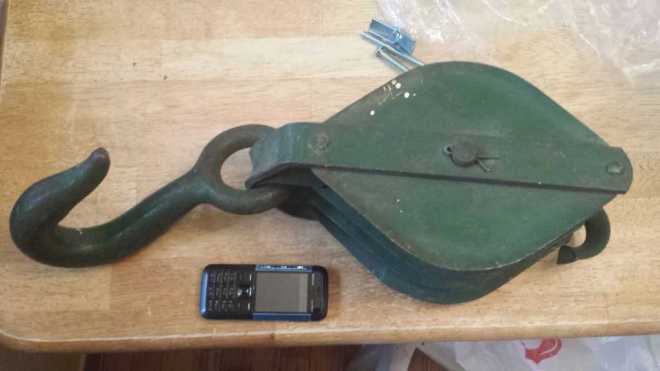
I’m using antique triple blocks that weigh about 20 lbs each. I need two for each pole- one on top and one on the bottom. They are rated at I-don’t-know-but-I’m-sure-it’s-a-lot pounds. They are not made anymore because no one does it like this. The physics behind them is pretty cool. My rope is rated at about 800 lbs, but the logs weigh between 3,000 – 6,000 lbs. Using the triple blocks, I’m gaining a 7:1 advantage- 850 lbs per log, but since I’m using 2 sets of blocks- one on each pole, it’s really 850/2 = 425 lbs per log…..Well, I thought it was cool.
Other equipment
The process for the first course
I stair-stepped the rebar before putting the logs on: I cut the longest rebar to 30″, then made the one next to it 28″, then 26″, etc. This helps when lowering the log so you only have to mind getting one piece of rebar in the log at at time.
I also tried the recommended template approach- lay a strip of 1×4 on the piers and mark where the rebar is, turn the log upside down and mark the holes on the log- but they were so bumpy and long that it didn’t work. I asked around- and found a method using string- attach a string to the piers, and measure the offset of the rebar from the string, (remembering that if the rebar is 1″ to the right of the string, the hole will be drilled 1″ to the left of the center mark on the log (because the log is upside down)). Transfer this info to the log, then drill straight down. Flip the log over (flip is a generous word), then attach to lifting straps, pull until it’s over the rebar. Then slowly lower the log until the rebar can be fed into the hole in the log (done by my wife).
Summary
This is very exciting. All the work for the past year+ designing our plans, getting utilities installed, cutting down trees, borating them, removing branches, burning brush piles, digging holes, building forms, fixing the tractor, and on and on- got us to this point. I guess you could say we are done with phase I. Phase II will be getting the rough in complete- the goal is to get the roof on this year (by New Years Eve). Phase III will be finishing the inside. So I’ll just say thanks for coming on this journey with us. Feel free to leave comments.Next up is the rest of the courses- these are placed on top of the log below, pilot holes drilled, then rebar is pounded through log and halfway into the log below- every two feet, and offset by one foot on alternating rows.