Showing posts with label rope. Show all posts

Saturday, December 16, 2017

It’s been a weird month

39028492852_f537e88207_k

I cut 6 more trees

I measure trees by their diameter (straight across the butt of the log), while Julie measures the circumference (with a tape all the way around the butt of the log).  Either way is fine, but since she’s picking the logs, we’re going with her measurement. The idea in the beginning was to stack logs from biggest circumference to smallest circumference. We got started on the second level, and were at a point where the circumference was about to drop below five feet. And then get skinny dramatically. There were still some big ones here and there that we could cut on our property and next door. Julie identified four that were at least five feet around and asked me to cut them. It was now or never. I cut a couple more that are also pretty big.
That was about a week or so before Thanksgiving. I cut them down, and then started moving them over to my racks for peeling. One happened to be back in a swampy area, so I ran into some problems moving it- couldn’t get close enough with the tractor- even with my 60′ cable. So I took down a pulley off one of my lifting poles and used that for mechanical advantage. It worked, but I broke my rope.
I also bent the forks on the tractor again, and re-welded them, and then bent them again. I have some new 5,000 lb forks from a forklift, but need the ok from my neighbor before I weld them onto his frame that I’m borrowing.
I got all of the logs racked, but it took about three weeks to peel just 4 of them- too cold for the bugs to help, and the sap is like glue. I have some huge calluses on my hands now, because manly. Yeah.

fixed the other truck

Meanwhile, my 1979 Ford F150 was having problems starting. I fought with it all of Thanksgiving weekend- I replaced the starter, the alternator, the ignition switch, and the spark plugs and wires. The only thing left is the cap, but I found out through a great shock (literally), that it is working fine. Only mechanics will laugh….
I needed it running reliably because I’m about to replace the motor in my Toyota pickup. But now it purrs like a kitten, and starts every time.

ordered a new motor

I bit the bullet and ordered a new motor (professionally rebuilt long block). Had to put it on the credit card, but don’t worry, selling the truck will pay off the credit card as well. I’ve been putting this off for almost a year. Last year, you’ll remember I had a valve crack in it, and replaced the head gasket. I guess it also messed up the crank. I’m motivated by the idea that it’s still worth a few thousand $$$, so fixing it will help us fund the roof of our home, which is probably the single most expensive part of this project.

 why we hate “daylight savings” or “not daylight savings”

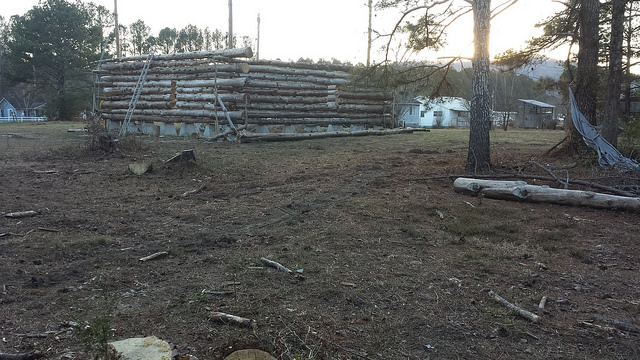
My boss lets me work 6:30 – 3:30. In the winter, this means I have about 1.5 hours of daylight after work. It might seem like a waste to go out there, only to be able to work for an hour, but every little bit of work I can do is  progress. Other LHBA members have to stop work altogether because of snow, so I don’t really want to complain. In the summer, I have almost 6 hours of daylight. If we wouldn’t “fall back”, I’d still have 2.5 hours of daylight in the winter. I realize that in the winter we are actually on standard time, but I’d give up an hour of daylight in the summer for an extra hour in the winter; who’s with me?
39028504892_fd6378c381_z

Still progressing

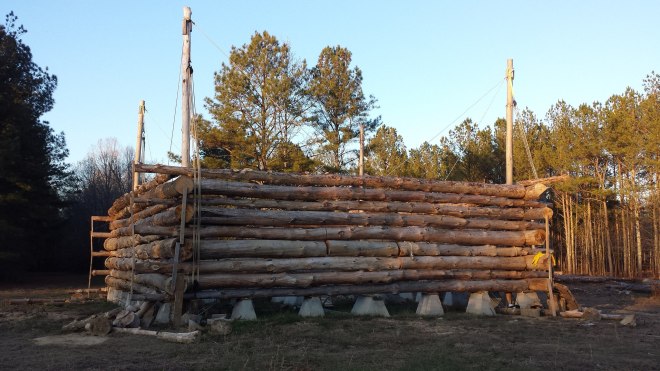
Last weekend, we burned some brush, and put up a log on Saturday. It was bitter cold in the morning, and windy all day. My lips are still chapped from exposure. This was the first log of the 10th course. We are about 12 feet off the foundation, and about 15 feet off the ground. It was pretty straight but had a long bow in it. While I was lifting it, one of the ropes broke right up near where it was tied to the tractor. It just snapped right off the front of the tractor. I saw a poof of dust, and the log falling. Nobody got hurt, and the house and log are fine. I pinned half the log, then hooked up a chain to the tip and had Julie pull it with the car to get the bow out. But it was still up about a foot off the one below. I went to grab my chain binders to bind it down, and I guess they got stolen. Kinda upset at that, and that we couldn’t finish that log. Went over to Harbor Freight that night for two new chain binders and a chain. This week, I finished binding it and added some more pins.
39028498052_9650d157e7_k

where do we go from here?

I have a bunch of vacation I have to use at work before the end of the year. Had a big project over the summer/fall that I needed to help out with that prevented me from taking vacation days, but it is winding down. I only have to come to work for 3 days for the rest of the year. And I still have more time from this year, but they let us carry over 40 hours from year to year.
We keep going. The new motor comes in this week. I want to get that job done, and get on with stacking. I ordered new rope, since the existing rope is getting pretty frayed. However, we are getting closer. I may have to hire a trac hoe to come pull my ridge pole out of the woods. The RPSL’s and the ridge pole are the next big items we have to install when the walls are done. After that- I took some measurements on my sawmill- I’m about to turn my 12′ of track into 28′ of track, and will then cut some rafters out of some “still growing” logs.
That’s all for now, folks. Thanks for all the likes on my wife’s video! Comments here are appreciated as well.

Wednesday, July 19, 2017

Up to the 4th course

The method

Each complete layer of logs (made up of all the logs that are on the same level) is called a “course”. The logs are oriented in alternating pin-wheel courses- and by pinwheel, I mean at each corner, one end of each log “passes” a log that is “butted” up against  it. On the next course, you reverse the butts and passes at that same corner, and on and on.
Each log is pinned with rebar to the layer below- every 2 feet. I won’t bore you with too many of the details, but it is a lot of work: for 1/2″ rebar, you drill a 1/2″ hole through the top log. You beat the rebar into the hole, and then halfway through the log beneath it – and you don’t drill into the log beneath for strength purposes. You can do the math- a 40 foot log requires 20 pieces of rebar, so each course requires at least 80 pieces of rebar. I’m on course four, so that’s 320 pieces so far. By hand, with a sledge hammer. I go through at least a gallon of water every evening. The LHBA recommends everyone do the first two courses by hand, and then buy a jack hammer for the courses after that. So, I did my due diligence, and have now graduated:

It’ll be here this week, along with a rod driver bit.
The logs…..are fickle: I made a spreadsheet to catalog the logs by size, length, cut date, peel date, etc, but I haven’t used it yet for stacking logs. My wife has taken over that role, and is doing an awesome job. Usually, our evening goes something like this:
Me: pounding rebar in from last night. Her: wandering around the racks of logs, measuring tape in hand, finding the log that will fit over the top of whatever crooked log we put up the day before. She keeps in mind the height of each course, the type of logs we already have up on whatever course we’re on (monster or regular, knotty or clean, etc.). She’s also looking for which log will match the log next to it- ideally, for each course, you find four logs that have the same bottom and top diameter. She’s also thinking about where the windows are, the stairs, the bathrooms, the doors, the kitchen cabinets, etc., etc., and which log will look best in each location. Each log has it’s own quirks- they bow in different directions, have odd knots, may not match the one below, or may match the one below perfectly. I do a bit of surgery on each log- cutting off a knot here or there to make it fit better with the one below. It is a lot of thinking and measuring.
Capture
When I’m done pinning, I go find the log she marked with an oil pastel (doesn’t wash off as easily as chalk) and drag it over to the house. We proceed to lift the log using the tractor and the block and tackle into position. I like to get it up there, then fine tune it. She likes to make sure it will fit before lifting it. So we argue a little over the method- sometimes she’s right, sometimes I’m right. Eventually the log gets where it’s going. I cut off the obvious knots and lower it down. We end up having to position it with the tractor for the vertical placement, and the car for the horizontal placement.
With these huge twisty monster logs on the lower layers, this process has been taking more than a night, but when it’s exactly right, I place enough rebar in it to hold it until it’s too dark to work, then we go home. Our evenings begin around 4:00 pm, and we usually pack up and go home around 9:00 PM.
I’d like to speed things up, but with the crooked logs we are working with, there is a lot of turning the log this way and that until it fits as well as can be expected. But these are “monster logs” for the lower layers- some are more than six feet around at the base, or 24″+ in diameter. They take quite a bit of effort to place.

Progress is…..as expected

Of course, I always think things are going to go faster than they do. But we really are making good progress, considering the weather for this month. We’ve had so much rain, they declared the drought was over. In fact, there’s been so much rain that trees are falling over around the county.

Rain causes quite a few issues- the tractor gets stuck, the logs are slippery, they get a little heavier when they’re wet, power equipment has to be kept dry, etc, etc. But I did find out something interesting: did you know that there’s no echo when beating rebar into a log during a downpour? My theory is that the raindrops absorb the sound. Go ahead- ask me how I know that…..

….And then there’s the heat

Yeah- when it’s not raining, the humidity started climbing along with the temperature. The last three days of last week, the heat index was 105. We delayed working on the cabin until early evening on those days. I usually end up soaked from sweat from head to toe. I bring a change of clothes for the drive home, and I go through about a gallon of water every evening. I shouldn’t work in the heat, but we want this so bad that I just push through it all. My amazing wife does laundry for me and repairs my jeans (I now own one pair without any repairs- she’s not happy about that, and banned me from wearing that one pair to the property).

Lessons learned

One thing we’ve learned is how much you can use the crookedest logs- if you know where your doors and windows are going to be. We’ve placed the orneriest logs- logs that curved in all different directions- and they look really good. Had to place temporary lifting poles in the middle to hold them while I cut out the crooks, but when it’s all done, they really look good.
Yes, you can remove a log after placing it. It’s not easy, but after pinning it once, then not liking it, I bought a sawzall from Harbor Freight, and cut all the rebar out of it while suspending it with the pulleys. I turned it and pinned it again, but ended up not liking that position either. So I cut it again, then carefully pulled it out. It just wasn’t working. I don’t recommend it- we lost a day’s worth of progress, but, in the words of my late friend Ken Hieronymi, “I guess I’ll just eventually go crazy from every time I come out here and see that [log] hanging there all cock-eyed.” Didn’t want that to happen, so I pulled the beast out of there.
The neat thing is, the logs look better up than they do down. Seems obvious, but until they are stacked, you can’t get an idea of how the whole thing is going to look. One thing we’re both really happy with is that we made the butts of the logs face the front and back of the house. That’s how I wanted it, but my wife thought it might look better with the tips of the logs facing the front- so that the huge logs wouldn’t distract from the look of the place. We put the discussion on the LHBA forum- and a lot of people said they wished they had gone with my idea. Then one guy said to think about how the roof overhang is going to be supported- with the tips of the logs or the butts? So, for strength, we went with the butts facing the front and back- and it looks so good! Because it’s a 40×40, we needed to offset the mass of the house with some massive looking logs- and boy do those butts look good! I just realized this is starting to sound like some other kind of discussion, but I assure you, I’m not going there!
See:

You made it this far? Here’s a treat:

This is a video of us lifting log #16 into place: Lifting Log #16 into place.

Thursday, June 22, 2017

First Layer Done


20170621_191651_zps7mylvvyk

This is a great feeling- The lifting poles worked, the pulleys and chain hoists worked, we figured out the kinks and got all four logs on the piers. It looks less like a grave yard with tombstones sticking up, and more like a….well, at least a perimeter with big posts sticking out of it: There was a little preparation required before setting the logs down on the piers:

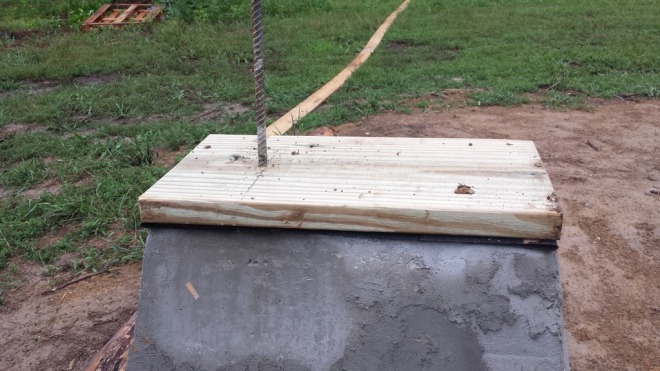
20170615_183820_zpsgquk3nsvThat’s pressure treated #2 pine – 2×12 from the local hardware store, laying on top of a shingle (90lb builder’s felt) that I sourced from the county dump (they were new in the plastic, so I scooped up a bunch).
We set the first log, then I had this nagging feeling that I was supposed to call the inspector before stacking logs. I was pretty sure he would find something wrong with the concrete. I checked the inspection schedule and it said a post-pour inspection was due, so I worked up the motivation and finally called him. He said- “No, go ahead and keep doing what you’re doing- call me when you get to the rough in.” Ok! We’re on a roll now. The rough in is when you have your electrical outlets and wires run, along with the plumbing, but you haven’t put any drywall in (yes, we will have framed walls inside the cabin, just like a normal home).

Piqued their interest


With four 30-foot lifting poles sticking up in the air, our property has become something of an attraction. Everyone from the water utility guys, to the motorcycle guy down the road slows down and takes a gander every time they drive by. The utility guys actually drove onto the property and looked over the mechanics of everything- according to one neighbor they were there for over an hour checking out the ropes, pulleys, rebar, and logs. The neighbors say this build is the “talk of the town”. Everyone is so nice and excited. Now when I’m out there working, I’ve seen several cars every day slow down to look. I’ve seen some stop, then back up, stare, then wave, and drive on slowly. A few have even pulled up, just to say hi (and get a closer look). The older guys who stop by tell me if they were 10-20 years younger, they’d be doing this too. It’s nice- the positive support is great motivation.  I usually wave and continue on with my business. The permit office lady saw me at the store last night. She said the utility guys had their doubts, but she set them straight- “Don’t worry- he’s an engineer- he’s got it all figured out.” Wellllllllllll……yeah. I’d like to think I’m more of a mathematician, you know, because that’s what my degree is in, but ok…….


A few notes about the method


If we were laying 2×4’s, it would be pretty easy- draw a center line on the 2×4, measure the distance between each piece of rebar, drill holes, place 2×4 on the pier, done. Logs are a little more hairy….
  • Curvy logs

They are not straight- and they may curve in more than one direction. Also there are a lot of knots on this wood. Finally, the logs have a lot of taper, which is a comparison of bottom diameter to the top diameter. The taper is a measure how much the diameter decreases from the bottom to the top.  LHBA recommends logs have a taper of less than 1 inch for every 10 feet. Our logs are about 20″ on the bottom, and 12″ at the top, and 40+ feet long. Our taper works out to be 20-12 = 8″ over 40 feet, or 2″ every 10′- double what LHBA recommends. But LHBA also recommends building with what you have. It can be done, but adds a level of complication when you try to level the structure. Probably more on that will come as we stack logs- each layer, you alternate butts and tops: where the butts are on one layer, is where the tops will be on next layer. If you “mind your levels”, i.e., measure the height at each corner as you stack, you can pick logs that match each other. The goal is less than 1/2″ height difference between all corners at the top of the walls.
  • Block and tackle

1489785074404_zpsq4tepvus
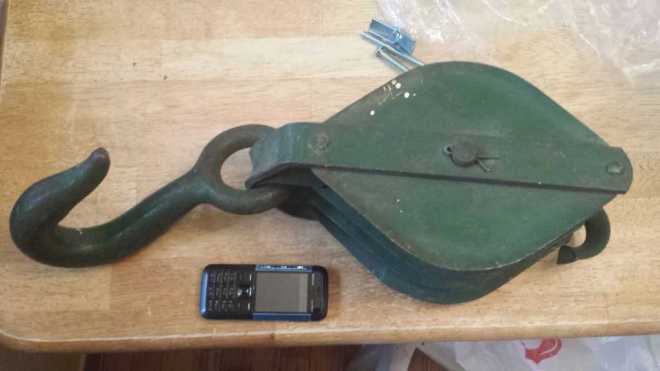
I’m using antique triple blocks that weigh about 20 lbs each. I need two for each pole- one on top and one on the bottom. They are rated at I-don’t-know-but-I’m-sure-it’s-a-lot pounds. They are not made anymore because no one does it like this. The physics behind them is pretty cool. My rope is rated at about 800 lbs, but the logs weigh between 3,000 – 6,000 lbs. Using the triple blocks, I’m gaining a 7:1 advantage- 850 lbs per log, but since I’m using 2 sets of blocks- one on each pole, it’s really 850/2 = 425 lbs per log…..Well, I thought it was cool.
  • Other equipment

I’m also using 6,400 lb straps from Harbor Freight, a Cant Hook (or “can” hook ), my wife’s Landcruiser (helps center the logs over the rebar), a chain saw, sledge hammer, some trucker chains (5,400 lb) and my trusty tractor.
  • The process for the first course

The first course is different from all the other layers- you are putting the log down on the rebar (cemented into the piers), instead of pounding the rebar into the log (like on the rest of the courses).

I stair-stepped the rebar before putting the logs on: I cut the longest rebar to 30″, then made the one next to it 28″, then 26″, etc. This helps when lowering the log so you only have to mind getting one piece of rebar in the log at at time.
I also tried the recommended template approach- lay a strip of 1×4 on the piers and mark where the rebar is, turn the log upside down and mark the holes on the log- but they were so bumpy and long that it didn’t work. I asked around- and found a method using string- attach a string to the piers, and measure the offset of the rebar from the string, (remembering that if the rebar is 1″ to the right of the string, the hole will be drilled 1″ to the left of the center mark on the log (because the log is upside down)).  Transfer this info to the log, then drill straight down. Flip the log over (flip is a generous word), then attach to lifting straps, pull until it’s over the rebar. Then slowly lower the log until the rebar can be fed into the hole in the log (done by my wife).

Summary

This is very exciting. All the work for the past year+ designing our plans, getting utilities installed, cutting down trees, borating them, removing branches, burning brush piles, digging holes, building forms, fixing the tractor, and on and on- got us to this point. I guess you could say we are done with phase I. Phase II will be getting the rough in complete- the goal is to get the roof on this year (by New Years Eve). Phase III will be finishing the inside. So I’ll just say thanks for coming on this journey with us. Feel free to leave comments.

Next up is the rest of the courses- these are placed on top of the log below, pilot holes drilled, then rebar is pounded through log and halfway into the log below- every two feet, and offset by one foot on alternating rows.